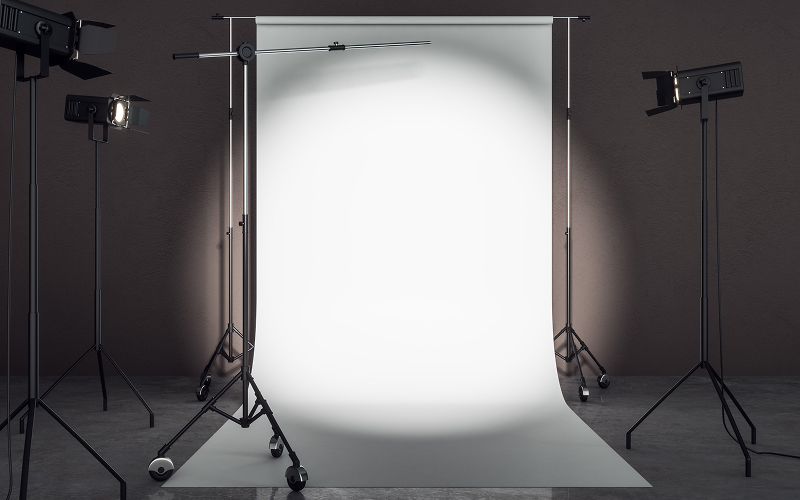
Introduction
Photography backdrops are often treated as a secondary element in a shoot, yet they play a defining role in how an image is perceived. Not just simply filling the background, they also influence how light behaves, how colours are interpreted, and how clearly the subject stands out.
A poorly chosen photography backdrop can create visual distractions, while a well-selected one supports clarity, balance, and consistency across images. In practical terms, the right photography backdrops reduce reliance on heavy editing, improve workflow efficiency, and allow photographers to achieve more predictable results.
With a wide range of options available today, understanding how photography backdrops work is essential for achieving consistent and controlled results. This knowledge supports more professional image outcomes across portrait, product, and lifestyle photography.
Key Takeaways:
- Photography backdrops directly influence subject clarity, lighting behaviour, and overall image tone, making them a critical technical decision rather than a purely aesthetic one.
- Different photography backdrop types serve different purposes, from seamless paper for consistency to fabric for flexibility and portability.
- Material choice affects workflow efficiency, as some backdrops require more preparation, maintenance, or replacement than others.
- Size and colour selection must align with shoot requirements, including subject count, lighting setup, and intended visual outcome.
- Proper setup, including tension, distance, and support systems, determines whether a backdrop enhances or disrupts the final image.
Overview of Photography Backdrops
What Is a Photography Backdrop and Why Does It Matter?
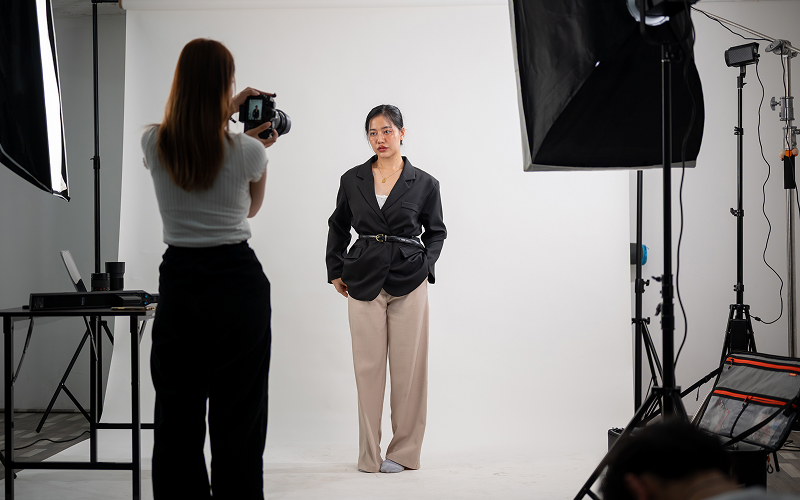
A photography backdrop is any surface placed behind a subject to create a controlled visual environment. While it may appear passive, it actively shapes composition, lighting, and depth within an image.
Backdrops are essential because they eliminate unwanted distractions and define how the subject is presented. From a portrait studio session to a commercial shoot, they ensure that the background supports the subject. Understanding backdrops at this level allows photographers to make intentional decisions.
What A Backdrop Actually Affects In A Photo?
A backdrop influences more than just how a photo looks. It affects how the subject is perceived, how light behaves, and how clearly the overall composition comes together.
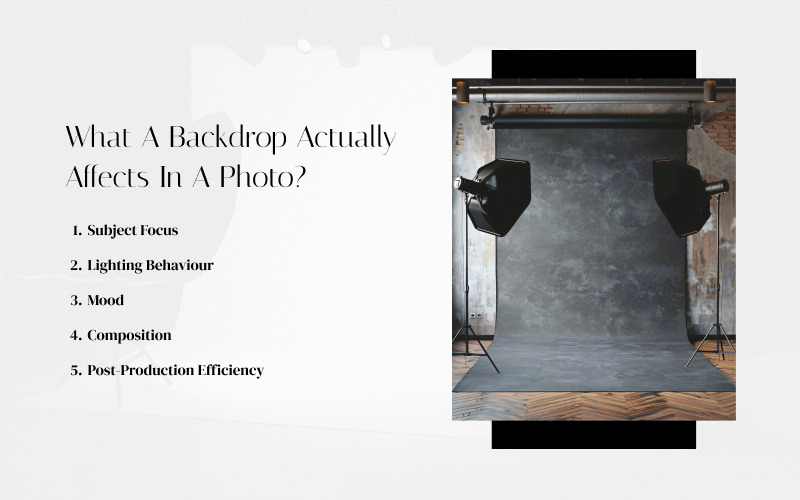
1. Subject Focus
The ability to enhance subject focus photography depends heavily on the backdrop. A clean, contrasting background helps isolate the subject, ensuring the viewer’s attention is directed correctly. When the backdrop blends too closely with the subject or contains excessive detail, it reduces clarity and visual hierarchy. This is especially important in a portrait photoshoot, as the subject’s expression and features should remain the primary focus.
2. Lighting Behaviour
Backdrops significantly affect how light behaves in a scene. Lighter surfaces reflect light and create a brighter image, whereas darker backdrops absorb light and increase contrast. Different backdrop materials for photography setups also influence light diffusion. For example, textured surfaces can introduce uneven highlights if not carefully controlled.
3. Mood
The mood of an image is closely tied to backdrop choice. Neutral tones are often used to maintain a professional and balanced appearance. Darker tones, in contrast, are typically chosen to create depth and a more intense visual effect. Brighter colours can convey energy but must be balanced carefully to avoid overpowering the subject.
4. Composition
Backdrops define spatial balance within a frame. They influence how elements are arranged and how the viewer’s eye moves across the image. A well-selected backdrop simplifies composition, while a poor one introduces clutter and imbalance.
5. Post-Production Efficiency
A properly chosen backdrop reduces editing time. Clean, evenly lit backgrounds minimise the need for retouching, colour correction, or background removal. This becomes more relevant in high-volume photography service workflows in Singapore. Reducing editing time helps maintain consistent and efficient turnaround.
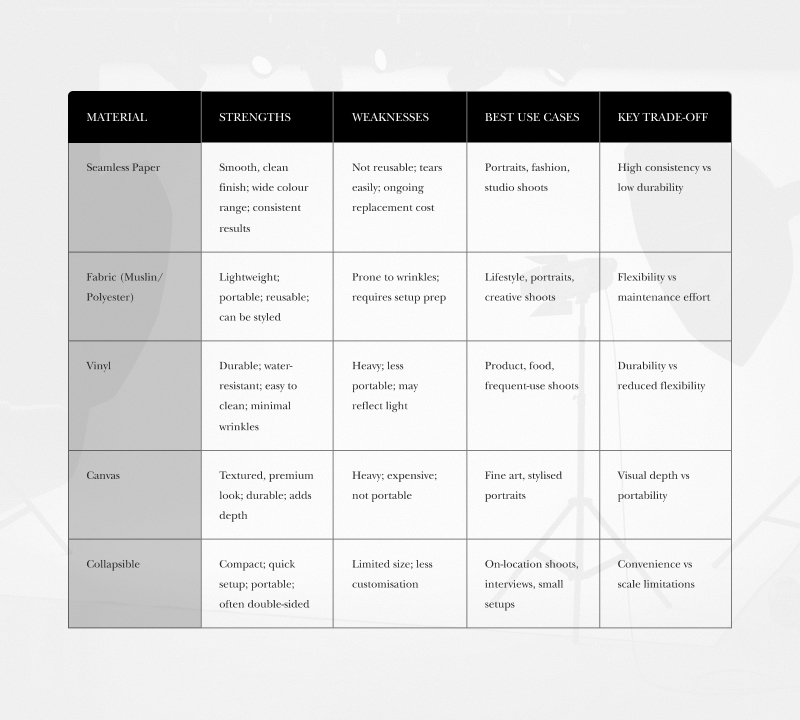
Comparing Photography Backdrop Materials: What to Consider
Choosing between different photography backdrop types requires balancing durability, flexibility, and visual output. Each material offers distinct advantages depending on the shooting environment and intended outcome.
1. Seamless Paper Backdrops
Seamless paper backdrops are widely used in controlled studio environments where visual consistency is a priority. Their defining advantage lies in their ability to produce a completely smooth, uniform surface without texture interference.
These backdrops work well when the goal is to keep attention entirely on the subject. This makes them a standard choice in commercial workflows where multiple images must match in tone and background across different sessions.
However, this same feature contributes to its limitations. As the material is not reusable, it leads to recurring costs, especially in shoots where it is frequently stepped on. Paper is also vulnerable to tearing and damage. This means it is less suitable for dynamic setups involving movement, props, or multiple subjects interacting with the space.
- Best use cases: Portrait photography, fashion shoots, commercial studio work requiring consistent output
- Trade-offs: High visual consistency and clean finish, but ongoing replacement cost and low durability
2. Fabric Backdrops (Muslin & Polyester)
Fabric backdrops are valued for their flexibility and adaptability. They are one of the most commonly used options across both studio and on-location photography. Unlike seamless paper, fabric introduces a degree of texture and depth. This helps create a more natural or styled appearance, depending on how it is used.
Ideal for lifestyle shoots, portraits, and creative setups, fabric offers the advantage of reusability. With proper care, a single backdrop can be used repeatedly. Besides, its lightweight nature also makes it easy to transport, benefiting photographers working across different locations or environments.
However, fabric requires more preparation compared to other materials. Wrinkles and folds are common and can become highly visible under certain lighting conditions. Achieving a wrinkle-free backdrop setup often involves steaming, stretching, or securing the material with clamps to maintain tension. Without this preparation, the backdrop may introduce unwanted distractions that reduce image quality.
- Best use cases: Lifestyle photography, portraits, portable setups, creative shoots
- Trade-offs: Flexible and reusable, but requires preparation and careful lighting control
3. Canvas Backdrops
Canvas backdrops are typically chosen when the backdrop itself is intended to contribute to the visual identity of the image. Unlike paper or fabric, canvas often features painted or textured surfaces that introduce depth, tonal variation, and a more distinctive aesthetic. It serves as a preferred option in fine art photography and stylised portrait work.
The thickness and rigidity of canvas provide a more stable surface, reducing issues such as wrinkles or unintended folds. This stability allows photographers to maintain a consistent look across shoots without the need for constant adjustment. Additionally, canvas interacts with light in a way that enhances depth, particularly when using directional lighting to highlight its texture.
However, these benefits come with practical limitations. Canvas backdrops are heavier and less portable. They may not be suitable for photographers who frequently work on location. In addition, they also require more storage space and careful handling to prevent damage, particularly for hand-painted designs. Cost is also a factor. Canvas backdrops are generally more expensive than paper or fabric.
- Best use cases: Fine art photography, stylised portraits, controlled studio shoots
- Trade-offs: Strong visual depth and durability, but limited portability and higher upfront cost
4. Collapsible Backdrops
Collapsible backdrops prioritise speed and portability. The pop-up design allows immediate use in time-sensitive environments such as interviews and content shoots. Another main advantage is portability. Collapsible backdrops are lightweight and compact when folded. Photographers can thereby transport them easily without requiring additional equipment. Many options also feature dual-sided designs, offering two background variations in a single unit. This adds flexibility without increasing setup complexity.
However, this convenience comes with limitations in scale and adaptability. The fixed size of collapsible backdrops can restrict framing options, particularly for full-body shots, big family portraits, or group photography. Unlike fabric or paper, they cannot be extended or adjusted to accommodate larger scenes.
Styling flexibility is also limited. While they are effective for simple, clean backgrounds, they do not offer the same level of customisation as other materials. This makes them less suitable for shoots that require specific textures, colours, or thematic setups.
- Best use cases: On-location shoots, interviews, content creation, small setups
- Trade-offs: Fast setup and portability, but limited size and reduced styling flexibility
Choosing and Setting Up a Photography Backdrop
What You Need To Know About Photography Backdrop Size
Selecting the correct size affects coverage, framing flexibility, subject movement, and lighting placement. A backdrop that is appropriately sized allows for more controlled and consistent results. This backdrop size guide helps align with different photoshoot setup needs.
1. Small (around 5–7 ft width)
Suitable for headshots, upper-body portraits, or small product photography
Smaller backdrops are typically used in tighter compositions where the subject occupies most of the frame. They are efficient for controlled setups with minimal movement, as they require less space and are easier to manage in smaller environments. However, they offer limited flexibility if the framing changes during the shoot, which may require repositioning or switching setups.
2. Medium (around 8–9 ft width)
Ideal for full-body portraits or small group shots, medium-sized backdrops provide a balance between coverage and practicality. They allow enough space for full-body framing while still being manageable in most studio environments. This size also provides more flexibility in subject positioning and lighting adjustments, making it a common choice for portrait sessions where variation in poses is required.
3. Large (10 ft and above)
Better for group photography, lifestyle shoots, or setups involving props and movement
Larger backdrops are necessary when the scene involves multiple subjects, movement, or additional elements such as props. They ensure that the background remains consistent across the entire frame, even when the composition changes. While they offer greater flexibility, they also require more space, stronger support systems, and careful setup to maintain stability and alignment.
How Different Photography Backdrop Colours Work
Backdrop colour selection shapes subject perception by influencing contrast, mood, and light distribution. It also affects exposure, colour accuracy, and the amount of post-processing required. Choosing the right colour helps maintain visual clarity and consistency in the final image.
1. Neutral Colours (White, Grey, Black)
Neutral backdrops are commonly used for their flexibility and clean visual output.
They provide a controlled base that allows the subject to stand out without competing visual elements, making them suitable for a wide range of photography styles.
- White reflects light efficiently and produces an evenly lit scene. Exposure must be controlled carefully to prevent blown highlights and loss of detail.
- Grey offers more flexibility. Its appearance shifts with lighting, allowing subtle tonal variation without changing the backdrop.
- Black absorbs light and reduces reflections. This increases contrast and strengthens separation between the subject and background.
In short, neutral colours are ideal when the goal is to keep attention on the subject without added visual complexity. They also provide greater consistency across different shoots, making them a practical choice for structured workflows.
2. Coloured Backdrops
Coloured backdrops introduce visual interest and can influence the overall tone of the image.
They are often used when the background needs to contribute to the mood or branding of the shoot rather than remain neutral.
- Brighter tones convey energy and draw attention. Often used for vibrant or expressive shoots, they can make images more visually striking.
- Muted or darker tones create a softer, more subdued atmosphere suitable for editorial or lifestyle photography. They help maintain focus on the subject while still adding visual character.
- Green screen allows for digital background replacement, offering flexibility in post-production. This approach is useful when the final background is not determined during the shoot, but it requires precise lighting and separation to achieve clean results.
3. Textured and Styled Backdrops
Backdrops with patterns or textures add depth and variation to an otherwise simple setup.
They are often used when the background is intended to enhance the visual narrative rather than remain neutral.
Texture breaks up flat surfaces and adds visual layers, giving the image more depth. It changes how the scene feels, creating a more styled or thematic look without relying heavily on props. Editorial, lifestyle, and food photography often use this approach when visual context needs to be clearly defined.
At the same time, textured backdrops introduce character while keeping the setup controlled. They are common in portrait and lifestyle shoots where a more defined environment is needed. Overuse can become distracting, so balance is important to keep attention on the subject.
How to Choose the Right Photography Backdrop Size and Colour
Selecting the right backdrop is not just about preference. It depends on how the shoot is planned, including the type of photography, number of subjects, lighting setup, and the intended visual tone. Considering these factors together helps ensure both visual consistency and practical usability.
1. By Shoot Type
Different types of photography require varying levels of coverage and visual control. The backdrop should align with the purpose of the shoot and not restrict composition or movement.
When selecting backdrops for portrait photography, medium to large backdrops in neutral colours are commonly used to create a clean, professional look and keep focus on the subject. Meanwhile, smaller backdrops are often sufficient for product photography. The white or light tones ensure clarity and consistency. A controlled background helps maintain colour accuracy and reduces distractions.
For lifestyle or creative shoots, larger backdrops allow more flexibility for movement, props, and styling. This supports more dynamic compositions and varied setups. Portable or collapsible backdrops are often preferred for convenience when it comes to content creation. They allow quick setup while still providing a controlled background.
2. By Number of Subjects
The number of people or objects in the frame directly affects the required backdrop size.
Adequate coverage ensures the background remains consistent across the entire composition.
- A single subject usually requires smaller backdrops. These backdrops are sufficient for headshots or upper-body compositions.
- Medium to large backdrops provide better framing and spacing for full-body portraits. This prevents edges from appearing in the frame.
- Larger backdrops are necessary for group shots to avoid visible edges and maintain balanced composition. This also allows for more flexibility in positioning multiple subjects.
Choosing a size that is too small can limit framing and create unwanted distractions in the final image. It may also require additional adjustments that disrupt workflow efficiency.
3. By Lighting Style
Lighting setup influences how the backdrop appears in the final image. The interaction between light and background determines overall exposure, contrast, and depth.
- Diffused lighting works well with most colours and materials, producing even results. This helps minimise shadows and create a balanced look.
- High-key lighting is often paired with white or light backdrops for a bright, minimal look. This setup emphasises clarity and simplicity.
- Low-key lighting is recommended for dark backdrops to create contrast and depth. This enhances mood and subject separation.
- Directional lighting can emphasise texture, making material choice more noticeable. This can be used intentionally but requires careful control.
The backdrop should complement the lighting rather than work against it. Poor alignment between the two can lead to uneven exposure or unintended visual effects.
4. By Intended Visual Tone
The overall look and feel of the image should guide colour selection, with the backdrop supporting the intended mood without overpowering the subject. Neutral tones such as white, grey, or black create a clean and professional result with strong visual clarity. Soft, muted colours or textured backgrounds introduce a warmer and more approachable feel that suits lifestyle or editorial setups.
Brighter colours add contrast and energy, helping the image stand out when used with control. Textured or painted backdrops contribute depth and support more stylised or artistic compositions. In all cases, colour choice should reinforce the subject and message, as a well-selected backdrop improves clarity while a poor choice can create visual conflict.
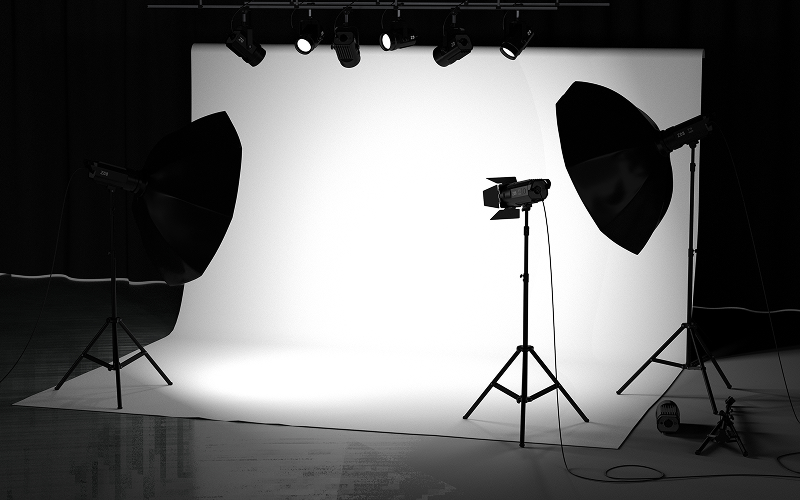
Photography Backdrop Setup: How to Get It Right
Proper setup determines how effective the backdrop is in the final image. Even the right material and size can produce poor results if the setup is unstable, uneven, or poorly aligned.
1. Support System
A standard setup typically includes:
- Backdrop stand or support system
- Crossbar or mounting rod
- Clamps or weights
A backdrop stand and support system form the foundation of any backdrop setup.
This typically includes a stand, crossbar, and clamps to hold the material securely in place.
Ensuring the setup is level and firmly secured helps prevent shifting or sagging during the shoot, which can disrupt composition and consistency.
2. Tension and Wrinkle Prevention
Keeping the backdrop smooth is essential for a clean finish. Also, apply tension using clamps or weights to help reduce wrinkles and uneven surfaces. For fabric backdrops, preparation such as steaming or stretching may be needed before use, as wrinkles can become more visible under certain lighting conditions.
3. Distance
The distance between the subject and backdrop affects both depth and image quality. Allowing enough space helps create separation, reduces shadow visibility, and prevents the image from appearing flat. It also provides more flexibility in lighting placement and subject positioning.
4. Shadow Management
Lighting should be positioned to minimise unwanted shadows on the backdrop. Adjusting light angles, using diffusers, or increasing subject distance can help create a more even background and improve overall balance. It is important to avoid poor shadow control as it can make the backdrop appear uneven, even if the material itself is smooth.

What are the Common Mistakes to Avoid?
Common mistakes in photography backdrop selection and setup often affect image quality more than expected. Identifying these issues early helps maintain consistency, reduce corrections, and improve overall results.
Wrinkled or uneven backdrop surfaces can distract from the subject and become more noticeable under directional lighting. This issue is often made worse when the subject is placed too close to the background, resulting in harsh shadows and a flatter overall image.
Lighting that is not properly positioned can highlight imperfections and create uneven exposure across the backdrop. In addition, using a backdrop that is too small limits framing options and may introduce unwanted edges into the final composition.
How Professional Studios Approach Photography Backdrop Selection and Setup
Consistency is often achieved through experience. Teams familiar with different materials, colours, and lighting conditions can anticipate challenges, allowing for smoother execution and more reliable results. Professional photo studios in Singapore approach backdrop setup as part of a structured workflow. This ensures that each element, from size selection to lighting alignment, is planned in advance rather than adjusted during the shoot.
1. Workflow Planning
Backdrop size is selected based on the shoot type, with the layout planned according to available space and subject movement. Equipment is arranged before the session to ensure the setup supports the intended outcome and reduces the need for adjustments during the shoot.
2. Consistency Control
Backdrops are aligned to maintain a smooth surface, with tension applied to minimise wrinkles. Lighting is calibrated to achieve balanced exposure across the scene. These steps support consistency across images, which is especially important in professional workflows.
3. Efficiency in Execution
Pre-configured setups reduce the need for adjustments, with materials selected based on the shoot requirements and positioning standardised across sessions. This approach minimises downtime and improves overall efficiency, allowing photographers to focus on capturing the subject.
Frequently Asked Questions
1. What is the best material for photography backdrops?
It depends on the use case. Seamless paper is ideal for a clean look, while fabric offers flexibility and reusability.
2. Is it better to set up a photography backdrop at home or use a professional studio?
Setting up a backdrop at home can work for simple shoots, but it often involves trial and error. A professional studio provides a more controlled environment, with proper use of space, stable support systems, and calibrated lighting. This helps reduce common technical issues such as wrinkles, uneven lighting, or poor framing, resulting in more consistent and reliable outcomes.
3. Why does studio expertise make a difference in photography backdrop setup?
Professional studios follow structured workflows that account for backdrop size, lighting, and composition from the start. This reduces setup errors, improves efficiency during the shoot, and ensures that lighting and materials are used effectively, leading to more predictable and consistent image quality.
Conclusion
Photography backdrops are not just background elements. They directly influence lighting, composition, and subject clarity, making them a fundamental part of any shoot. Understanding materials, sizes, colours, and setup techniques allows photographers to achieve more controlled and consistent results.
While it is possible to experiment with different setups independently, achieving reliable outcomes often requires experience and a structured approach. For individuals seeking consistent, high-quality results without the trial-and-error process, working within a reliable studio for photoshoots in Singapore is highly recommended.
If you are planning a shoot and want a setup that delivers consistent, well-controlled results, working with an experienced team can make a clear difference. At ABC Photography, each session is structured to align backdrop selection, lighting, and composition from the start, reducing common setup issues and improving overall image quality.
Reach out to discuss how your next shoot can be planned more effectively.


ABC Photography
Services
Location
+65 6258 8186
Weekdays: 10.30 am - 7 pm
Weekends: 10 am - 7 pm